
12 Days of Christmas Workout (Intro)

One of my favourite ways (and simplest!) to cook salmon is to bake it. Here’s a delicious recipe for a quick, high-protein dish. If you feel confident in the kitchen, use the base of this recipe (salmon in tin foil in the oven) and then go wild! While I’ve provided an easy dressing here, I also am known to dress the salmon with whatever’s in my fridge- sometimes fresh squeezed lemon and grated garlic, tomatoes and basil from the garden with balsamic vinegar, or even just a glug of sweet chilli sauce and into the oven it goes!
This particular version is particularly special because the brown sugar crystalizes into a lovely crust atop the mustard marinade which gives lovely texture and helps cut through the dijon really well. It also lends itself well to a multitude of side dishes, but we love roasting broccoli and potatoes on the same tray with a little olive oil and garlic- cooks at the same temperature and in the same amount of time. Easy dinner in under 30 minutes with little prep. (Pictured here with caraway carrot kale slaw & roasted broccoli).
Ingredients:
salmon fillets
2 tsp dijon mustard
2 tsp olive oil
2 sprigs fresh coriander, chopped
1 clove garlic, grated
Juice of 1/2 lime (and keep the empty rinds)
2 tsp brown sugar
course Sea Salt, to taste
Method:
Preheat the oven to 180C.
Line a baking tray with tin foil (parchment will also work), gently roll up the edges so no liquid can escape. Place the salmon fillets onto the centre of the foil, skin side down.
In a small bowl, use a fork or small whisk to combine the dijon mustard, olive oil, coriander, grated garlic, and lime juice.
Using the fork, a pastry brush, or even your fingers, evenly slather the dressing across the fillets.
Sprinkle the brown sugar across the fillets (this is what will ‘crust’ the salmon). Sprinkle sea salt. Place the empty lime rinds and even some extra coriander if you like near the fish.
Create a parcel by using another piece of tin foil or parchment and scrunching the sides together so that a little ‘steam room’ is created for your fish. Leave a small gap so that a little air can escape, but no juices.
Bake for 20 minutes (or until the inside of the fish is cooked through).
Enjoy your deliciously moist and flavourful dinner with your side dishes of choice!
Serves up to 10 (depends on if a side or a ‘main’), but makes a lot!
Keeps for 2 days if stored in the fridge in an airtight container.
Ingredients:
Dressing:
75ml apple cyder vinegar
Juice of 1 lime (about 1tbsp)
1 tsp soy sauce (or tamari if gluten free)
1 tsp maple syrup
4 Tbsp extra virgin olive oil
1 Tbsp white sugar
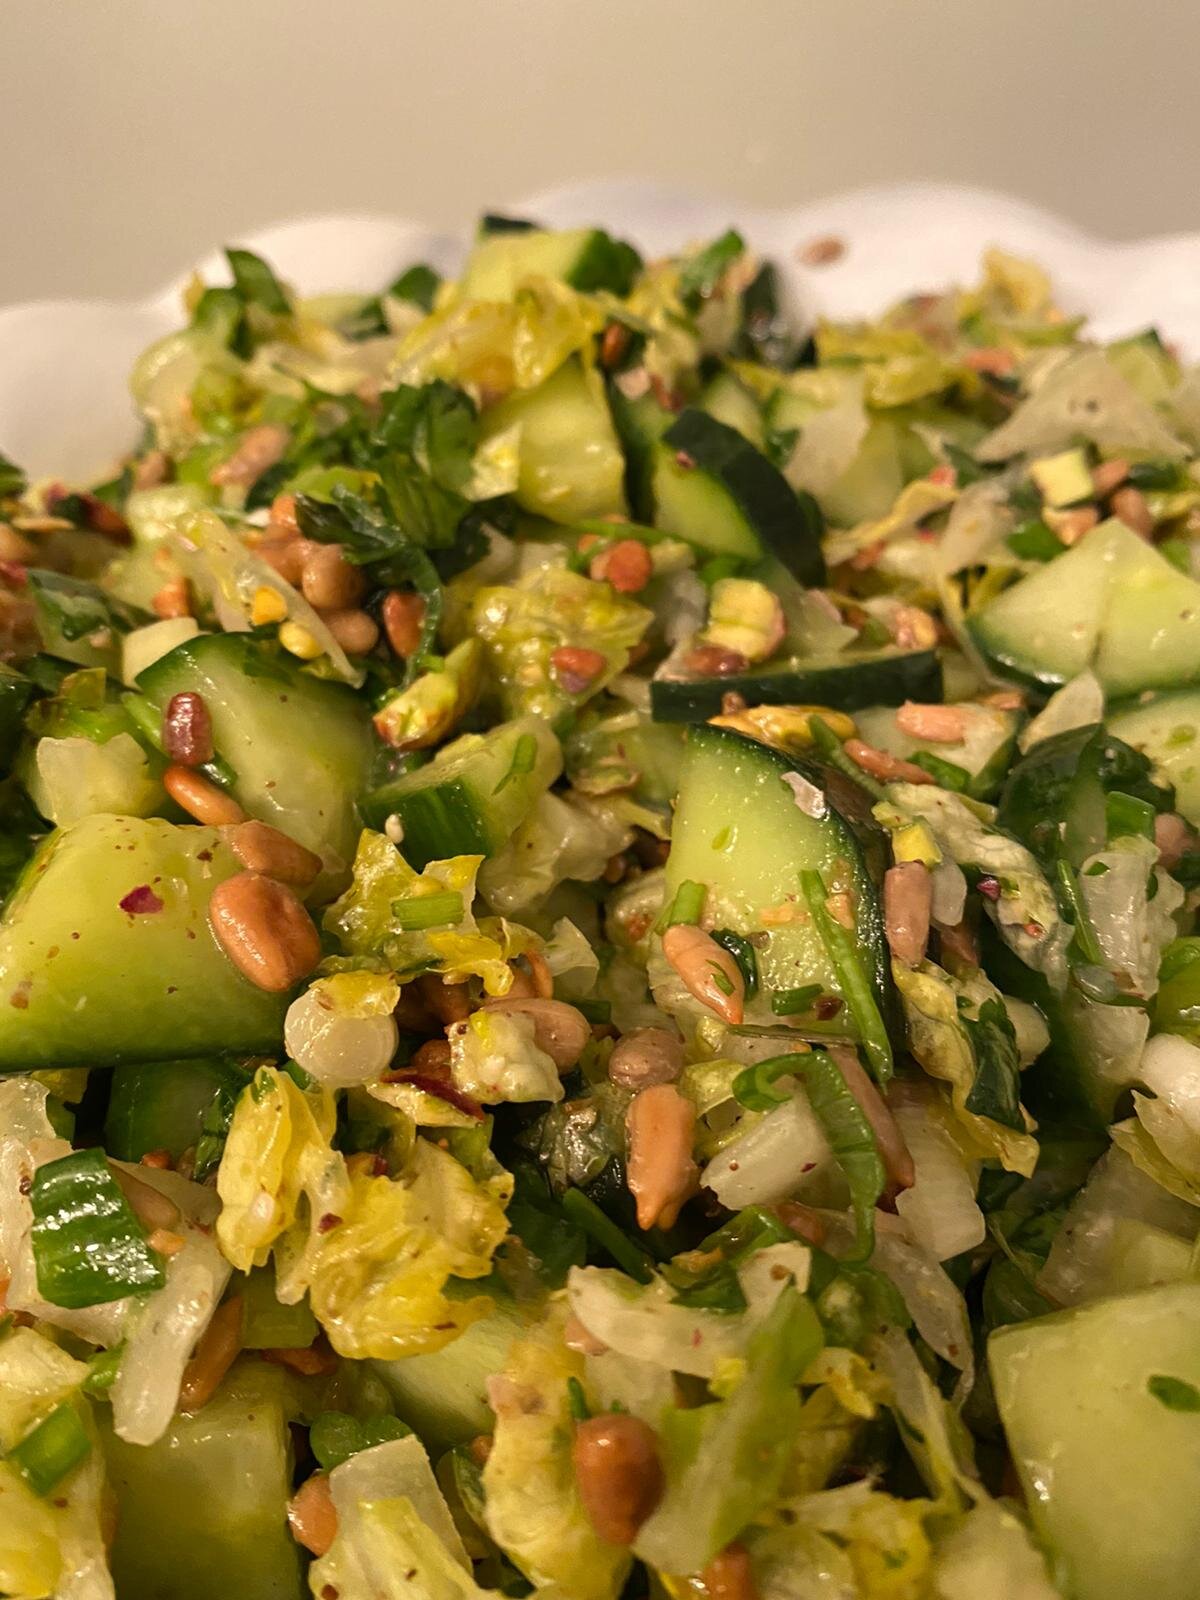
Salad:
2 large cucumbers, quartered and sliced
1 head romaine lettuce, julienned
½ bunch coriander, fined chopped
½ tsp sea salt
1 Tbsp Zaatar (optional)
41g pistachios, chopped small
32g toasted sunflower seeds
Method:
Make the dressing: in a small bowl combine the vinegar, lime juice, soy sauce, maple syrup, olive oil, and white sugar. Whisk until emulsified.
In a large bowl, place diced cucumbers, julienned lettuce, & coriander mixing well with a wooden spoon to combine.
Sprinkle the sea salt & zaatar on top and mix again.
Whisk and then pour the dressing over top and again mix with a wooden spoon to combine.
Add the pistachios and sunflower seeds and give a final mix so all ingredients are evenly distributed.
Serve with any protein of choice (we went for a lemon roasted chicken! YUM!).
WEEK 1
Team Dynamic:
Hi, my name is Steph and I'm your PT who can't do a pull up. Don't get me wrong, I used to be able to do them - loads as well, and a mere 6 years ago. The thing is, you stop doing pull ups, even for a week let alone 6 years, you lose it. (An aside: the reason I stopped doing pull ups is I could no longer keep up with lifting the weight gain of my pregnancy!).
So I'm challenging myself this lockdown: 30 days to 1 full pull-up. Can it be done? Eh, I may be pushing it a bit, but that won't stop me trying (and progressing!) and it definitely won't stop YOU all from holding me accountable! I'll post my home workouts here- simple ones that pack a punch. Since I am working from home, it'll be a bigger challenge to use my body weight for progression (no cable machines for those lat pulldowns, for example!).
Want to join me? What's the one exercise you've always wanted to be able to accomplish? Is it a full press up? A low squat? A headstand? 1km run? A centre split? Let's take these 30 days and dedicate 5 minutes a day towards that goal. Reach out to your PT for guidance if you need.
It's just 30 days. Let's raise (to) the bar! We got this.
WEEK 2
Week 1 under my belt, and my set-up is working... I think? Pull ups are a funny one because you can't do one until you can. Because I don't have resistance bands to change (green to orange in the studio, for example), I'm relying on how 'hard' it feels. Which, dependent on the time of day I'm doing these pull-ups, definitely varies.
Biggest surprise for me this week is... I don't feel stronger. Logically, I know pull-ups take their sweet time to build up to, but it's another mental push to continue with something so hard when I don't feel any different today than I did yesterday. The slow build will be worth it, but sometimes it's hard to remind myself of that. Thanks for keeping me in check, Team Dynamic!
WEEK 3
Another week down, and 140 more pull-ups done! Below is the routine I followed, taking out my initial cardio plan (which I've been getting via walks with the dog since my knee gave up early on in lockdown for much more).
Here are some things I've noticed:
1) I'm still nowhere near doing an unassisted pull-up
2) I can connect to the lower half of the pull-up exponentially better than I ever have been able to with a band assist. I'm fairly confident that I'll have the bottom half of a pull-up nailed before the upper 50% with this method, which is awesome because that's always been the harder part for me as my brain couldn't seem to make the right muscles work at the right time.
3) It's REALLY EASY to abuse my power and just smash through 20 pull-ups with a heavy assist from my legs, but it's also SUPER rewarding to feel that connection mentioned in no. 2. I've started using the first 10 to max capacity and then doing 2 sets x 5 reps to finish off at whatever speed I want.
These negative pull-ups in the tabata are also a bit laughable after doing 20 assisted. I don't think I've yet to make it past 5s- which does indicate I'm giving a pretty good level to my assists!
One more week (and a bit) to go! I'll check in with you guys again next week!
WEEK 4
Things I LOVED about using the chair assisted pull up method this month:
1) I mentioned before, but it's so much easier to feel that lower half back connection and transition
2) My posture has improved. I think stretching myself lengthways every day has benefits.
3) I could just KEEP GOING. If I had wanted to do a set of 20 (or even 50) I could have, I just transferred more power into my legs.
Things I didn't like:
1) I felt like I was always doing pull ups.
2) I had too much opportunity to cheat and use my legs to lift.
3) I have blisters on my hands, and it's from being on that bar for 5 minutes a day every day this month!
Overall, I reckon it would take me 3-4 months using this method to get to a pull-up, but since I'll be back in the gym, I think I'll be more likely to incorporate a banded or TRX technique to continue working back up to the pull up!
Have you all tried this method? Let me know what you think!
steph@getdynamic.co.uk
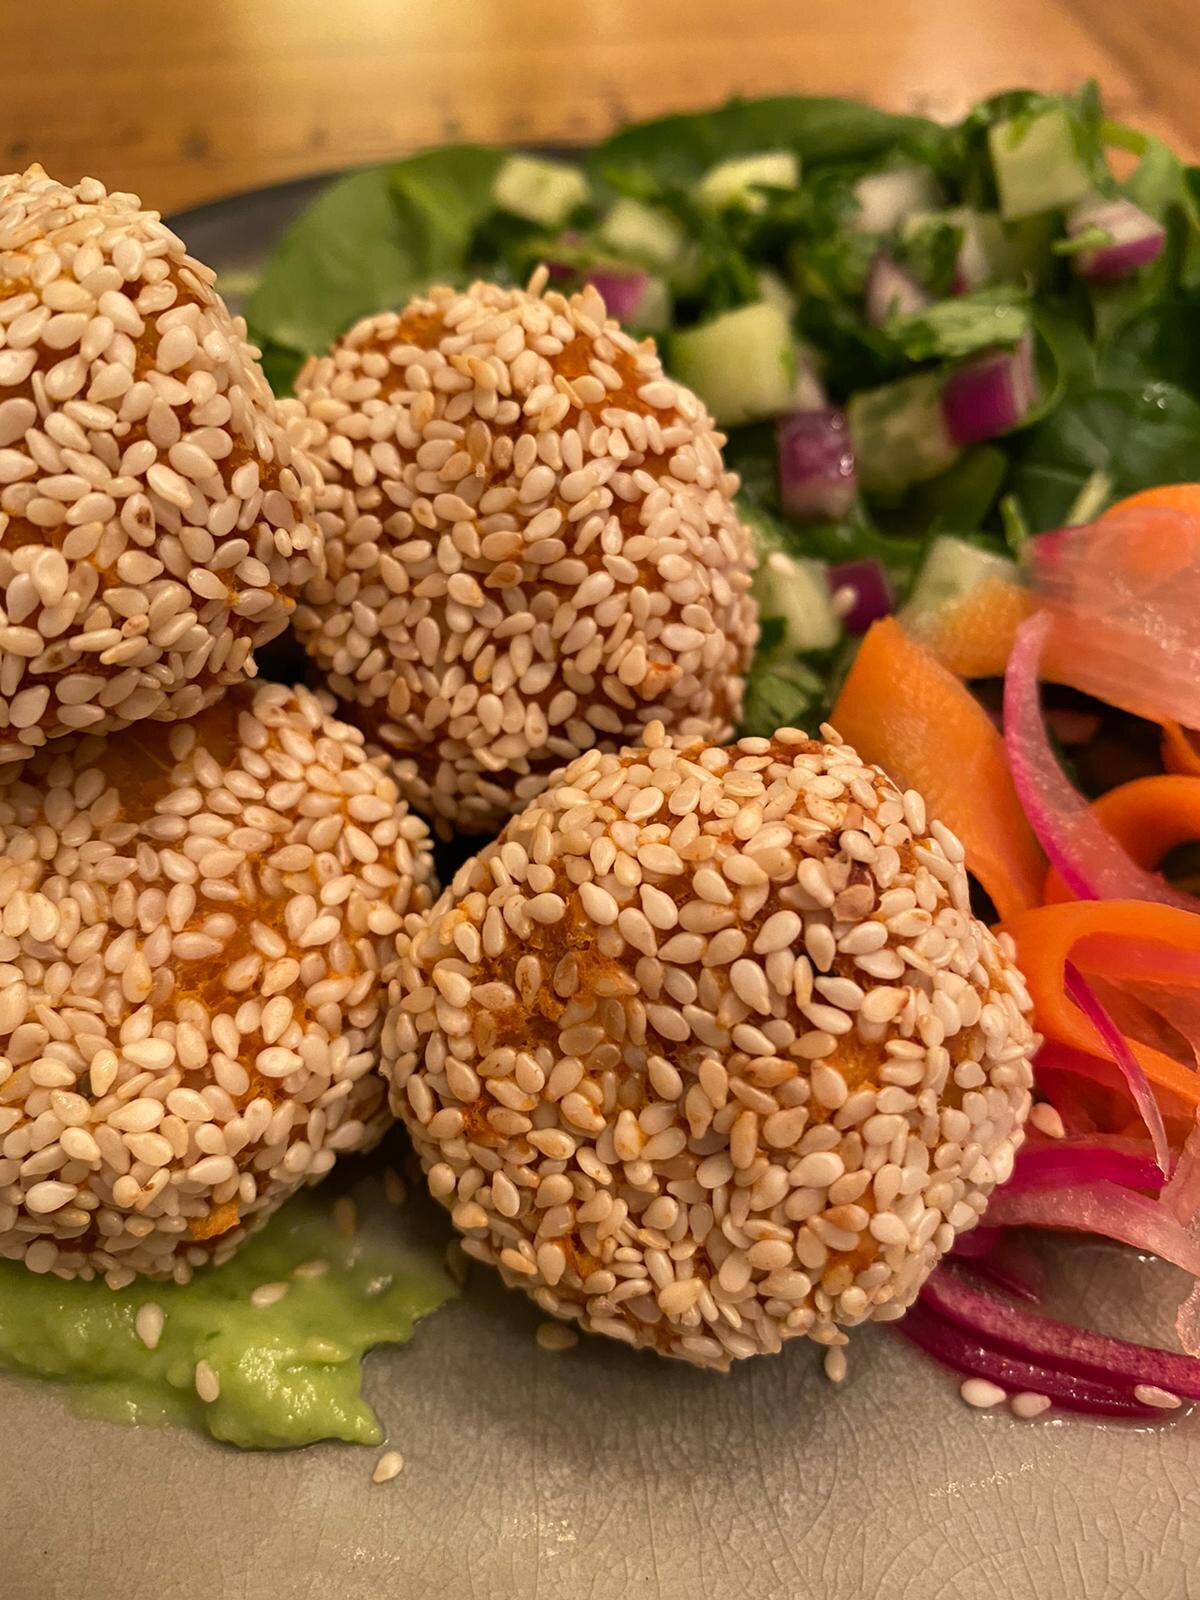
INGREDIENTS:
450g butternut squash (peeled and diced into 1-inch blocks)
½ tsp olive oil
½ tsp coriander seeds
400g can chickpeas, drained
1 clove garlic, grated
1 ¼ tsp smoked sea salt
1 ½ tsp ground coriander
1 ½ tsp smoked paprika
Grated zest of 1 lemon
Juice of ½ lemon
2 Tbsp plain flour (or a gluten-free flour of choice if you’d prefer)
4-8 Tbsp sesame seeds
METHOD:
Roast the Squash: pre-heat oven to 180C. Toss the blocks of squash with ½ tsp olive oil, a pinch of smoked sea salt, & the coriander seeds and lay out evenly across a non-stick baking tray. Roast for about 20 minutes (until the squash is soft all the way through).
In a large bowl (or a food processor if you have one), mash together the drained chickpeas, grated garlic, smoked sea salt, ground coriander, smoked paprika, and lemon zest & juice. You should be able to get this pretty smooth with a potato masher, but don’t worry about some lumps. We’ll mash again in a bit. Set aside.
Once squash is cooked, pour the squash & cumin seeds into the bowl with the chickpea mixture. Use your masher to evenly mash through. Add flour. You’ll have quite a wet mix, but that’s OK. You just need to be able to roll the mix into balls that hold together.
Using your hands, roll the mixture into balls about 1.5 inches diameter. If you find it’s too wet, add another Tbsp of flour at a time until consistency is right. I ended up with 18 balls. Gently lay the balls onto a baking sheet lined with parchment.
Place into the fridge to firm up- about 2 hours.
When ready to bake: Pre-heat the oven to 180C. Pour sesame seeds into a small bowl. Drop each squash ball into the bowl to coat. Place back onto the lined baking tray. Bake for 10minutes, flip the balls over and cook again for 10 minutes.


My coaching looks at all areas of your health – nutrition, sleep, stress, hydration, exercise, confidence, mindset and self reflection.
I chose not to give out diet plans, instead I like to help you create a food plan that is personalised to you, your lifestyle & taste preferences.
I aim to improve your relationship with food, seeing nothing as good or bad, but creating balance whilst still enjoying life.
I want to help you diminish feelings of guilt and instead gain an understanding of food and how to control it, instead of it controlling you.
I will help you to not only reach your goals but also give you the tools and knowledge to better understand nutrition, enabling you to feel empowered to independently manage your diet in the future.
My Offer to Dynamic clients only
- Book a consultation for £10 and use that against any programme
- Book a 1 off 1 hour coaching session ( Not currently an option for any other clients)
- Recommend a friend and receive a further £10 off of your programme.
The last one in our lockdown series is the Max Plank
Get down and give it a go!

Let’s Talk about the WALL SQUAT

You know it, you love it: it’s that super challenge at the end of every goal session (right after running- we’re so mean!). BUT the wall sit has loads of incredible benefits.
It works your entire lower body, requiring your glutes, quads, hamstrings, and calves to work in unison… all while pushing your pain threshold.
It burns calories: because your muscles remain contracted for the whole move, you’ll notice your heart rate increase which results in more calories burned over time.
It’s a weight bearing exercise: weight bearing exercises help build strong bones which decrease your chances of suffering from broken or fractured bones.
Now, Let’s Chat FORM and TOP TIPS for success:
From a standing position, feet shoulder width apart, lean against the wall of your choice.
Walk your feet out away from you, pressing your back against the wall. Slide your back down the wall until there is a 90 degree angle at both your hips and your knees. Your knees should be directly over your ankles. DO NOT allow them to track over your toes!! You should feel your body weight in your heels not your toes.
Hands should be on the wall, out in front of you, crossed over your chest... basically anywhere that isn’t resting on your thighs, which makes the exercise easier.
Ensure your back is leaning against the wall with full spine, including head and neck, in a neutral position.
ENGAGE YOUR ABS! Make every exercise an ab exercise. Contracted abs for the duration of your wall sit means your abs are getting endurance training at the same time! Win!
When you have had enough, push UP to stand. Crumbling to the floor, with legs of jelly, can actually cause damage to your knees because tendons & ligaments are fatigued.
CHALLENGE YOURSELF
Place a weight across your lap
Single leg straight lift: From your wall sit position, lift one foot out to straight (knees stay in alignment)
March in place- slow and steady lift the alternating knees.
Lift your heels off the floor to really feel those calf muscles!
Add in a bicep curl, lateral raise, or shoulder press using weights. Added bonus of distracting you from your screaming quads.
DYNAMIC CHALLENGE!
Every day this week, we challenge you to increase your wall sit by attaching them to a daily task.
For example, waiting for the kettle to boil, brushing your teeth, folding laundry, or watching the morning news. Try to complete 1 minute of wall-sit throughout each day, whether it's in 6 x 10s sits to practice getting in and out of the position or a full 1-minute hold. Tying your wall sit to a daily task will help make it a habit in addition to your regular workouts.
Let us know what task you tied your daily wall sits to to complete this challenge and what benefits you saw over the week by Sunday!